
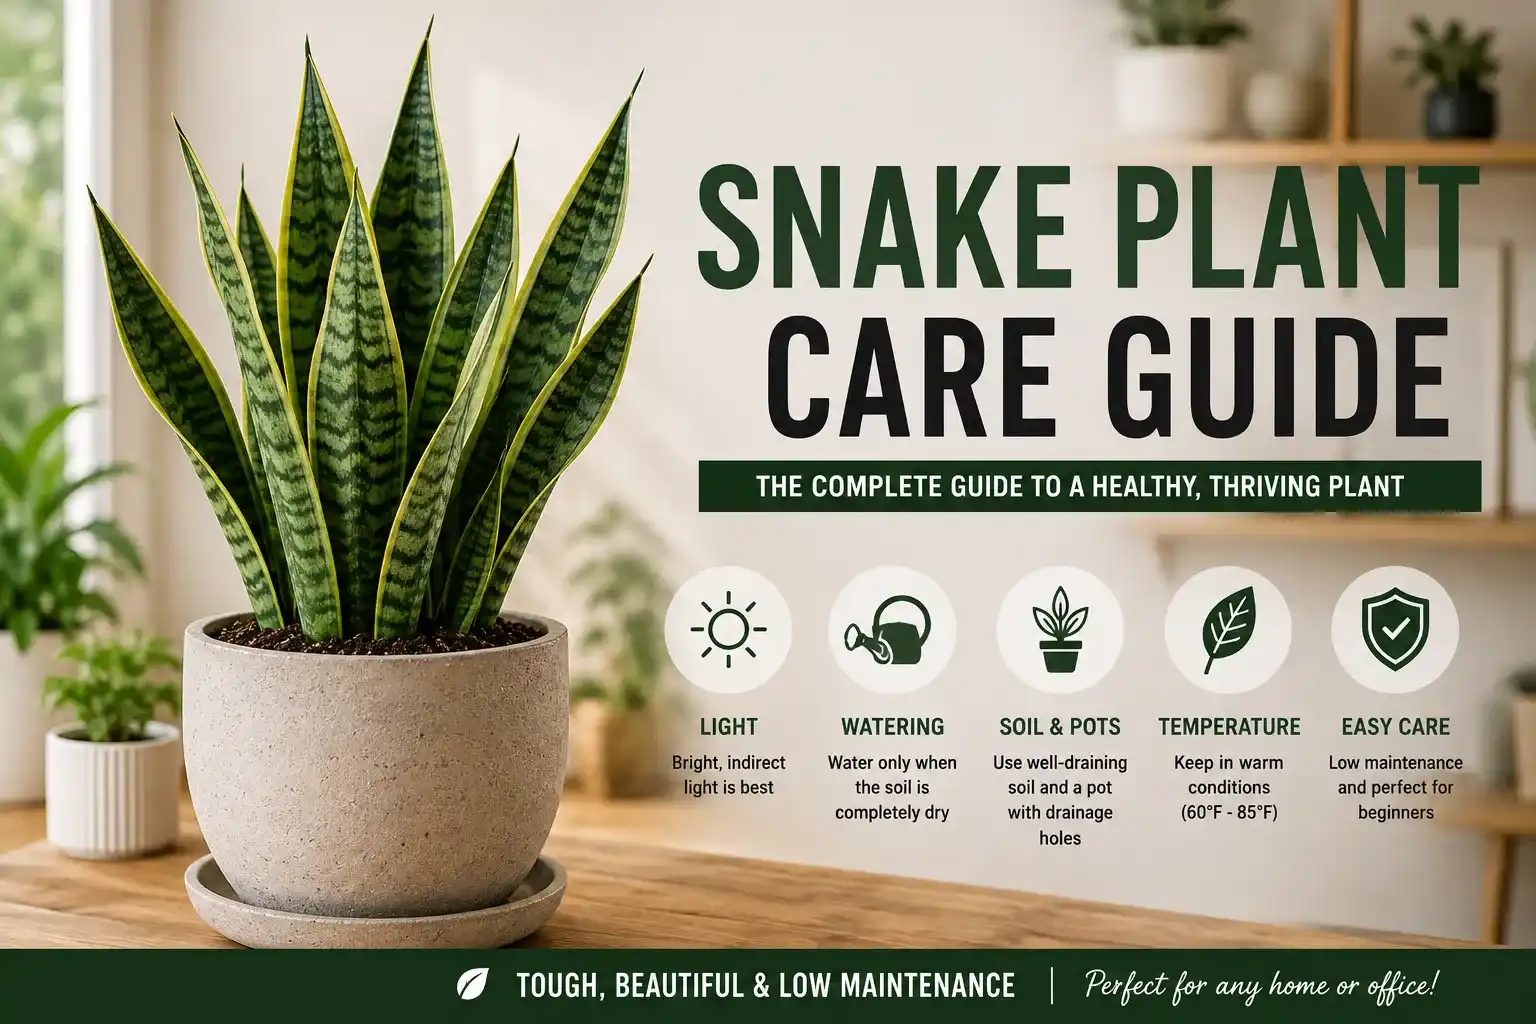
Snake Plant Care Guide
You bought a snake plant three weeks ago. It’s still alive, which feels like a win. But the leaves are drooping despite watering weekly, and you’re starting to wonder if plants aren’t for you.
These plants have a different idea of care than you do. They don’t want weekly attention; they want neglect. Once you flip that mindset, they become nearly impossible to kill.
What if the main reason your plant is dying is actually that you’re being too nice to it? What if mastering snake plant care is the gateway skill to a lifetime of successful houseplants?
Maybe you think you’re not a plant person. Maybe you’ve killed plants before. Maybe your apartment gets almost no sunlight, or you travel for work and forget to water for weeks. We’ll address all of that. This guide was built for people with zero plant experience, busy schedules, dark homes, and the ability to mess up and still succeed.
Here’s the straightforward truth: Snake plants Sansevieria need bright, indirect light and well-draining soil. Water only when the soil is completely dry—every 2-4 weeks in the growing season and every 4-6 weeks in dormancy. Keep temperatures between 60-80°F. They thrive on neglect and are nearly impossible to kill, making them perfect for beginners. This is what 20 years of plant care experience tells us and what thousands of beginner successes confirm.
What Is A Snake Plant, And Why Is It The Easiest Plant For Beginners?
A snake plant Sansevieria, also called Dracaena trifasciata by botanists, is a succulent-like houseplant with tall, pointed leaves that come in multiple varieties and colors. It’s the easiest plant for beginners because it tolerates neglect, low light, and irregular watering, thriving best when ignored.
The Plant’s Real Identity Succulent Roots, Not Leafy Fern
They aren’t related to ferns or typical tropical houseplants. They’re succulent plants that store water in their leaves and stems, which means they’ve evolved to survive drought. This is the single most important thing to understand about Sansevieria care. When a plant stores water in its leaves, it doesn’t need to be watered frequently. In fact, it prefers to dry out between waterings.
The scientific name Dracaena trifasciata and the common name snake plant, mother-in-law’s tongue both refer to the same plant. It’s native to the arid regions of West Africa, specifically Nigeria and Cameroon, where water is scarce and temperatures fluctuate. This heritage explains everything you need to know about how to care for it.
Most beginners fail with houseplants because they follow generic watering schedules for tropical plants. Snake plants are the opposite: they evolved in environments where watering happens once every few months, not weekly. Understanding this changes your entire approach.
Main varieties you’ll encounter:
- Sansevieria trifasciata classic tall form, deep green with mottled pattern
- Sansevieria trifasciata Laurentii identical to trifasciata but with gold/yellow leaf edges
- Sansevieria cylindrica: thin, cylindrical leaves, very modern look
- Sansevieria ‘Moonshine’ pale silvery-green, soft appearance
- Sansevieria hahnii compact, nest-like rosette form
All varieties share identical care requirements. Differences are purely visual and based on personal preference.
Why Beginners Succeed with Snake Plants and Everyone Else Fails at Other Plants
The reason these plants dominate beginner plant collections is straightforward: they reward the exact mistakes that kill every other houseplant.
Most houseplants demand consistent attention. They want regular watering, high humidity, steady temperatures, and bright light. If you miss a watering cycle, forget to mist the leaves, or leave a window open on a cold night, they die.
Snake plants don’t care. Here’s what they tolerate:
- Neglect: Skip watering for 3 weeks? Fine. A month? Still fine.
- Low light: They grow slower in dim conditions, but they don’t look pale or weak the way other plants do. They just… exist, looking normal.
- Temperature swings: A drafty window or an air-conditioned office that drops to 60°F? They handle it.
- Irregular watering: You water on Tuesday one week and Friday the next week? No problem.
- Forgiving watering window: Their 1-4 week tolerance for watering is enormous compared to succulents that need water every 10 days or tropical plants every 5 days.
This is why they appear in corporate lobbies, dentist offices, and dark apartment corners. They aren’t there because designers love them, though they do; they’re architecturally beautiful. They’re there because they literally cannot die from neglect.
Beginners also report that their snake plants helped them build confidence for other plants. Successfully caring for something that demands almost nothing proves you’re capable of keeping plants alive, which psychologically opens the door to attempting trickier species.
The Snake Plant’s One Weakness Overwatering and Why You’ll Do It Anyway
Here’s the cruel irony: the easiest plant to keep alive has exactly one way to die, and it’s the opposite of how most plants die.
Most houseplants die from underwatering. Snake plants die from overwatering.
Most people assume plant care means watering regularly. We’re conditioned by years of caring for gardens, lawns, and tropical houseplants that need regular water. When you bring a snake plant home, your instinct is to water it weekly, like a pothos or philodendron. Beginners lose the plant.
Overwatering this plant doesn’t just make it unhappy. It causes root rot, where roots suffocate and die because they’re in waterlogged soil with no oxygen. Once root rot starts, it spreads quickly. The plant looks fine for a week or two; then suddenly the stems become mushy and the leaves collapse.
The second half of this guide is dedicated entirely to preventing and fixing overwatering, because it’s the one thing standing between you and unlimited success with this plant.
The Complete Watering Guide How And When To Water Your Snake Plant Without Killing It
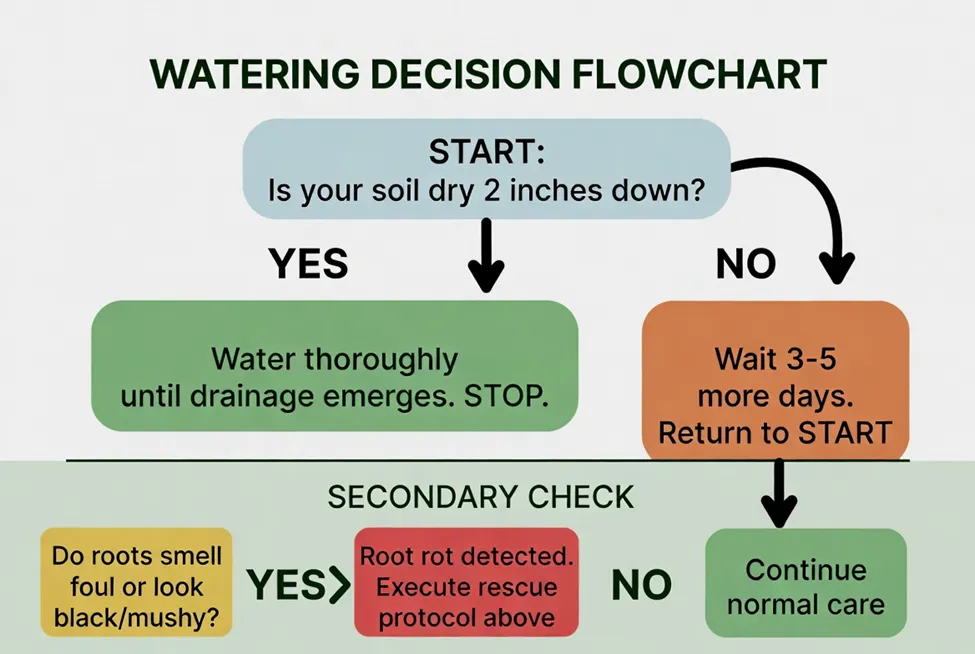
Water every 2-4 weeks in the growing season (spring/summer) and every 4-6 weeks in dormancy (fall/winter). Wait until soil is completely dry before watering. Overwatering is the top cause of death; when in doubt, don’t water.
The Watering Frequency Myth Why Weekly Is a Death Sentence
The most common piece of advice given to snake plant owners is to water once a week. This advice shows up on plant care guides, in gardening forums, and sometimes even on the tags that come with the plant itself.
It is catastrophically wrong.
Why does this myth persist? Because it’s generic advice for houseplants. It works for most tropical houseplants like pothos, philodendron, and rubber plants that have shallow roots and thin leaves. These plants evolved in rainforests where water is abundant and adapted to use water quickly. Plants evolved in deserts where water appears once every few months. Their roots are thick, their leaves are fleshy, and they store water internally. A weekly watering schedule gives them 4-5x more water than they can use, and the excess sits in the soil with nowhere to go. Roots suffocate. Soil becomes anaerobic. Rot begins.
The turning point in your snake plant success is when you stop thinking I should water this and start thinking I should water only when necessary. These opposite mindsets lead to opposite outcomes.
The Goldilocks Test How to Know When Your Soil Is Actually Dry
Beginners struggle with watering because they don’t know what completely dry feels like. Is it bone-dry? Slightly damp? A little crusty? There are methods to know for certain.
The tactile finger method is most practical:
Stick your finger 2 inches into the soil. If it feels damp or cool to the touch, don’t water yet; if it feels completely dry, almost dusty or chalky, water now. This is the most reliable method and requires no equipment. Do this every 5-7 days during growing season and every 7-10 days during dormancy until you internalize the difference between moist and dry soil.
The visual cue:
Dry soil and moist soil look noticeably different in color. When wet, potting soil is dark brown or nearly black. When dry, it’s light tan, grey, or beige. Over time, you’ll recognize the color shift without touching the soil. This method works through ceramic pots but is harder with terracotta, which absorbs water and changes color.
The pot weight test:
Lift the pot immediately after watering. The weight is surprising; it’s heavy. Lift it again a week later. The difference is dramatic. Once the soil is dry, the pot feels significantly lighter. Your hands will learn to recognize this difference and it becomes a subconscious check every time you water.
The soil moisture meter is optional but helpful:
A moisture meter is a simple $8-15 device that removes guesswork entirely. Stick it into the soil, and it gives you a numerical reading. Most meters recommend watering when the reading falls below 3-4 on a 1-10 scale. This tool is especially useful for beginners who are still learning what dry feels like, or for people with sensory processing differences who find tactile feedback unreliable.
The critical detail beginners miss is the difference between moist and wet. Moist soil has some moisture but isn’t waterlogged; it feels cool and slightly damp, not muddy. Wet soil is soggy, muddy, and waterlogged. For snake plants, even moist is too wet. Aim for completely dry, almost slightly shriveled. This feels neglectful but is exactly what succulents need.
Watering Frequency by Season and Why It Changes
Snake plants don’t have the same water needs year-round. Growth rates change with seasons, and water requirements follow.
Spring/Summer March-August Growing Season:
The plant is actively growing and using more water. Watering frequency increases to every 2-3 weeks. Some people water every 2 weeks; others every 3-4 weeks. The difference depends on light levels, pot size, and soil composition. The key variable is soil dryness, not the calendar. Wait for the soil to be completely dry, then water. This might happen every 2 weeks in one home and every 4 weeks in another. Trust the soil, not the date.
Fall/Winter September-February Dormancy:
As daylight hours decrease and temperatures drop, even if you have indoor climate control, the plant enters dormancy. It stops growing. Metabolic processes slow dramatically. Water needs drop. Watering frequency extends to every 4-6 weeks, or sometimes even longer if your home is cold below 65°F. Some plant owners report watering their snake plants only once or twice during winter. This is normal and healthy. The plant isn’t dying; it’s resting.
Why seasonal adjustment matters: Beginners who water on a fixed winter schedule every 2 weeks year-round are almost certainly overwatering during dormancy. The soil stays wet longer because the plant isn’t using water. Roots sit in moisture. Rot develops. This is why November through February sees the most snake plant deaths among novice growers.
The Watering Method and Why It Matters More Than You Think
How you water matters almost as much as how often.
The soak-and-drain method preferred for snake plants:
Pour water at the base of the plant, not on the leaves, until water runs out of the drainage holes. Wait 10 minutes for all excess to drain. Then discard the water that has pooled in the saucer or tray below the pot. This method ensures the roots have access to oxygen in the upper soil layers while the bottom drains completely.
Why bottom-up watering is NOT ideal for snake plants:
Some guides recommend placing the pot in a basin of water and letting it absorb moisture from below, called bottom watering. This works fine for some plants. But for snake plants, bottom-up watering can leave the soil saturated longer than necessary because water absorption is slower and the soil stays wet as the plant finishes absorbing it. Stick with top-down soak-and-drain.
Why misting does absolutely nothing:
Misting the leaves with a spray bottle is a popular plant care ritual for tropical plants with thin leaves; misting increases humidity. For succulents with thick, waxy leaves, misting does nothing. The water beads up and runs off. It doesn’t hydrate the plant or the soil. Save the misting ritual for your ferns. Snake plants don’t need it.
Room-temperature water is fine:
Don’t overthink water temperature. Tap water works perfectly. Cold water won’t shock the roots in most climates. Distilled water is unnecessary and expensive. If your tap water is extremely hard, visibly mineral-heavy, you might filter it, but this is rare. For 99% of homes, tap water at room temperature is exactly right.
Root Rot Reality Recognizing and Fixing the #1 Snake Plant Killer
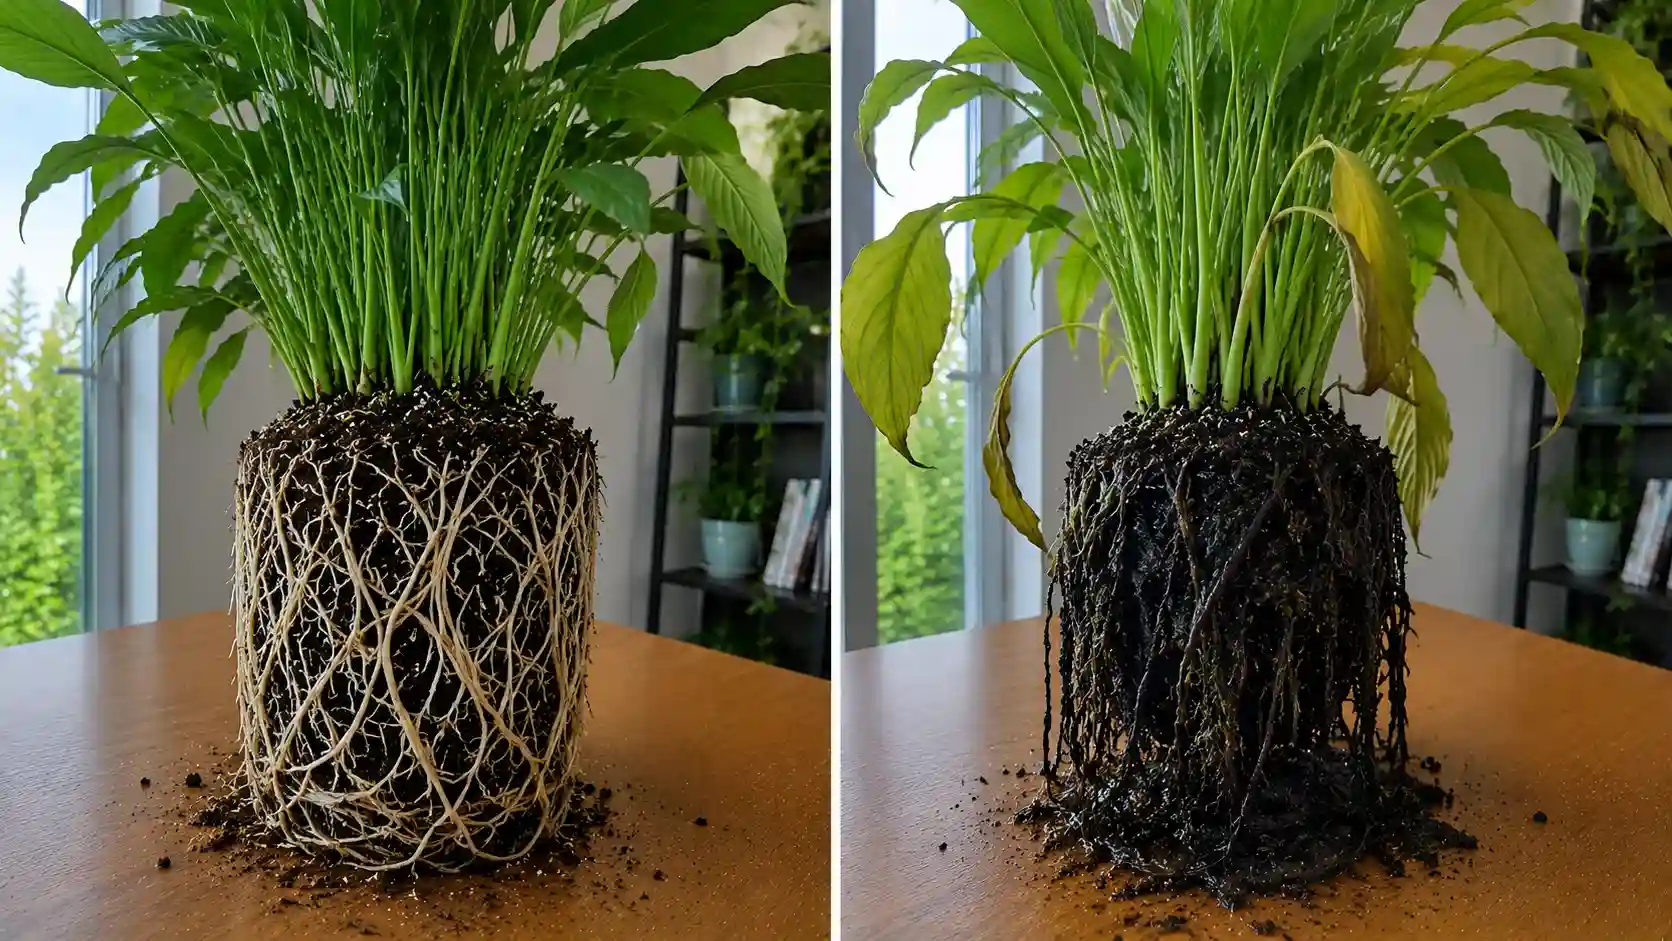
Root rot is the only thing that will kill a healthy snake plant. Everything else low light, cold drafts, skipped fertilizing the plant tolerates. But root rot is fatal if left unchecked.
What overwatering actually does:
When soil stays waterlogged, oxygen is displaced from the soil spaces. Roots need oxygen to function; this is true for 99% of plants. Without oxygen, roots start to die. Dead roots turn black or brown and become mushy and soft. The rot spreads from the rhizome, the underground stem from which roots grow outward, to the root system. Once the rhizome is compromised, the plant often can’t be saved.
Early-stage signs catch it here:
- Leaf softness or slight wilting despite moist soil sounds wrong, but this is a classic sign.
- Slight foul smell from the soil, the smell of anaerobic decay
- Slower growth or yellowing lower leaves when watering hasn’t changed
- Roots visible in the soil look dark instead of white.
Late-stage signs recovery is harder:
- Mushy stems at soil line; stems collapse when touched.
- Strong foul odor from the soil like compost left in a garage
- Leaves fall off easily or are completely limp.
- The entire base of the plant feels soft and unstable.
Practitioner detail that beginners miss:
Root rot spreads from the rhizome outward. Even if leaves look completely fine and only the base smells bad, the rhizome may already be heavily damaged. Beginners catch soft stems and panic, but they inspect only the leaves and roots. They miss the real damage at the soil line. Always inspect the spot where the stems meet the soil when troubleshooting. If the base is soft or mushy, root rot is advanced.
Rescue protocol: execute this immediately if you suspect root rot:
- Remove the plant from the pot; be gentle; the root system is fragile. Gently shake off old soil into a trash bin.
- Inspect the roots; healthy roots are white, cream-colored, or pale tan and feel firm. Rotten roots are black or dark brown and feel squishy and weak.
- Trim the rotten parts: using sterile scissors or a clean knife, cut away all black/mushy roots. Cut back to white tissue. If the rhizome is soft or mushy, trim that too, cutting into healthy tissue. This sounds drastic, but it’s necessary.
- Air-dry the cut rhizome: let the cut surfaces sit in air for 30 minutes. This prevents the rot from immediately re-infecting the fresh cuts.
- Repot in fresh soil; use new, dry cactus or succulent soil. Don’t reuse the old soil. Place the trimmed plant in the center of the new pot and fill around it with fresh soil.
- Wait 2 weeks before watering; this is the hard part. The newly trimmed roots need time to callus over and begin new growth. Watering now will trigger rot again. Wait 2 weeks. The plant will look sad and droopy. This is normal. It’s not dying; it’s recovering.
- After 2 weeks, resume normal watering. Use the Goldilocks test. When soil is completely dry, water thoroughly.
Survival rate: If caught early, only the roots are affected; the rhizome is still firm, and the survival rate is 70-80%. If the rhizome is already mushy, survival drops to 30-40%. But it’s worth attempting the rescue regardless.
Prevention is infinitely easier than rescue: Don’t get here. Use the Goldilocks test: pot with drainage holes, well-draining soil, and a watering frequency based on soil dryness rather than a calendar.
Watering Decision Flowchart
|
Scenario |
Pot Size |
Light |
Season |
Frequency |
Signs of Error |
|
Apartment, Medium Pot, Bright Indirect Light, Spring |
6-8 |
Bright Indirect |
Spring |
Every 2-3 weeks |
Drooping underwater; soft stems overwater |
|
Office Desk, Small Pot, Fluorescent Light, Year-Round |
4-6 |
Low Office Lights |
Any |
Every 4-6 weeks |
Yellowing overwater; pale growth no light |
|
Dark Corner, Large Pot, No Direct Sun, Winter |
8-10 |
Low Dark |
Winter |
Every 5-8 weeks |
Slow/no growth normal in dormancy |
|
Sunny Window, Ceramic Pot, Direct Afternoon Sun, Summer |
6-8 |
Bright/Direct Sun |
Summer |
Every 2-3 weeks |
Leaf bleaching direct sun; dry soil water more |
|
High-Humidity Bathroom, Small Pot, Indirect Light, Spring |
4-6 |
Indirect |
Spring |
Every 3-4 weeks |
Fungal spots humidity + overwater; soft leaves |
Light Finding The Right Spot Even In A Dark Apartment Or Dim Office
Snake plants thrive in bright, indirect light but tolerate low light better than most houseplants. Place near a north or east-facing window, or 3-5 feet from any light source. Avoid direct midday sun. Even dim offices work if the plant is positioned near a window or task light.
Light Levels Explained for Non-Scientists
Bright indirect light means different things to different people. Let’s make it concrete.
Bright indirect light: Light that comes into your space but doesn’t hit the plant directly. Imagine a window with a sheer curtain; the light passes through but is diffused. Or imagine a room where light enters from a direction opposite the plant; the whole room is bright, but the plant itself isn’t in direct rays. If you can read a book comfortably in the spot without a lamp, the light is good enough.
Indirect medium light: Bright enough that colors look normal, but you might need a lamp to read in the darkest corner of the room. This is the light level 3-5 feet from a north-facing window, or in the middle of an office lit only by overhead fixtures.
Low light: The room is lit mainly by lamps or is far from any window. You’d need a lamp to read comfortably. Most dark apartment interiors or basement-level offices fall here. Importantly, low light doesn’t mean no light; it means the plant isn’t getting direct sun and ambient light is soft.
Direct sun: 3+ hours per day of unfiltered sun coming straight through the window glass. This is intense, hot light. South-facing and west-facing windows get direct sun in the afternoon. North-facing and east-facing windows don’t.
Here’s the crucial fact: snake plants tolerate low light. They won’t thrive or grow quickly, but they survive and look healthy. Most houseplants in low light become pale, leggy, and sad. Snake plants stay compact and vibrant; they grow slower.
|
Light Type |
Visual Description |
Plant Response |
Example Location |
Ideal? |
|
Bright Indirect |
Diffused light, no direct sun rays |
Fast growth 10+ new leaves/year, vibrant color |
North window, sheer curtain on south window |
Ideal |
|
Indirect Medium |
Bright room, no direct sun on leaves |
Normal growth 5-8 leaves/year, stable color |
3-5 feet from east/west window |
Good |
|
Low Light |
Room lit by overhead/lamps only, far from window |
Slow growth 2-3 leaves/year, color remains normal no paleness |
Dark corner, interior room, office desk |
✅ Acceptable |
|
Direct Sun Afternoon |
3+ hours of direct rays, hot glass |
Leaf bleaching washed-out color, stress |
Direct south or west window no curtain |
Avoid |
Specific Placement Recommendations by Apartment Type
North-facing window: Ideal for snake plants. This is the best placement if you have it. North-facing windows provide consistent, soft, indirect light all day. The plant gets even light without intensity. Growth is strong without stress.
East-facing window: Good. Morning sun is gentle and warm. The plant benefits from the early light without the harsh afternoon heat. Place the plant a few feet away from the glass to avoid direct rays, or use a sheer curtain if the plant is on the windowsill.
South-facing window: Requires a sheer curtain or placement 3+ feet back from the glass. South-facing windows get intense afternoon sun. Direct sun bleaches snake plant leaves; they fade to a washed-out, pale color and look unhealthy. A sheer curtain diffuses the light perfectly.
West-facing window: Similar to south, intense afternoon heat. Use a curtain or move the plant 5+ feet away from the window. West-facing sun is often hotter and more direct than south-facing sun, so err toward more distance or thicker curtaining.
No windows, dark corner, interior room: Snake plants still survive here. Growth is slow; you might see 2-3 new leaves per year instead of 10. The plant doesn’t develop pale color or weakness; it just grows at a glacial pace. This is acceptable if it’s your only option. If you want to speed growth, add an inexpensive LED grow light $20-40, 15W positioned 12 inches above or to the side of the plant, running 8 hours per day. This supplement helps, but it’s not required.
Office without windows: Same principle. Fluorescent overhead lights are low-intensity, but snake plants tolerate this. If the plant is near a desk lamp or task light that comes on during the day, that helps. Again, optional supplemental grow light improves growth but isn’t necessary.
The Low-Light Exception Why Snake Plants Are Different
Most houseplants in low light become leggy: the stems stretch, the leaves space out, and new growth is pale and weak. This is the plant reaching for light, expending energy on stem growth rather than leaf health. It’s a survival strategy, but it looks terrible.
Snake plants don’t do this. In low light, they grow slowly and compactly. New leaves are the same color and size as they would be in bright light; there are just fewer of them. The plant looks normal, just stationary.
This is why dark apartments and dim offices can still have beautiful, healthy-looking snake plants. Growth rate is the variable, not health or aesthetics.
Lower expectations make low-light snake plant care easier: expect 2-3 new leaves per year instead of 10+. Expect growth to be visible in seasons, not weeks. But expect the plant to look fine, not sad.
Takeaway: If your only option is a dark corner, go ahead and put your snake plant there. It will live.
Seasonal Light Shifts and What to Do
In winter, daylight hours are shorter, and the sun is lower on the horizon. Even a south-facing window has less intense light in December than in July.
Should you move your plant seasonally to follow the light? No. Stability matters more than light optimization. Moving a plant back and forth every season stresses it and disrupts the root system. Leave it where it is.
If you notice slower growth in winter, it’s not a crisis; it’s normal dormancy. The plant isn’t sick; it’s resting. Continue your normal watering schedule; actually, extend it because the plant is using less water. Growth will resume in spring.
Only if the plant is visibly struggling pale new leaves, very slow growth, or leaves looking weak add a grow light supplement. Otherwise, trust that seasonal slowdown is normal.
The Myth of Rotating Your Plant
Many plant care guides recommend rotating your plant every 2-4 weeks for even growth and to prevent it from leaning toward the light.
This is optional, not required.
Snake plants do grow toward light; this is phototropism, a natural response. If you want a tall, directional plant, rotate once monthly. If you want a full, bushy plant, rotate less. If you want an asymmetrical, sculptural look which some design-focused plant owners prefer, never rotate.
Practitioner detail: Rotation doesn’t affect plant health. It’s purely aesthetic. Beginners often rotate their plants thinking it’s a care requirement, but it’s not. If rotating your plant feels like extra work, skip it.
Soil, Pots, And Repotting: Building The Foundation Your Snake Plant Needs
Use well-draining soil, cactus or snake plant mix in a pot with drainage holes. Repot every 2-3 years only if root-bound or growth has stopped. Snake plants prefer slightly tight containers; don’t jump to a larger pot unless roots are circling the soil.
Soil Composition Why Standard Potting Mix Kills Snake Plants
Here’s where most people make their first and sometimes fatal soil mistake:
Standard potting soil is designed for tropical houseplants and moisture-loving plants like ferns. It retains water. This is perfect if you’re growing a peace lily or a pothos, which want consistent moisture. It’s terrible for succulents, which want soil that dries out quickly.
When you use standard potting mix for a snake plant, water lingers in the soil longer than the plant can tolerate. Roots stay moist. Anaerobic conditions develop. Rot begins. This is why so many beginners who use standard soil fail despite doing everything else right.
The ideal snake plant soil composition:
- 50% cactus/succulent soil specialized pre-made mix designed to drain fast
- 50% perlite volcanic rock that creates air pockets, speeds drainage
Alternative formula:
- 70% cactus soil + 30% orchid bark. Orchid bark is lightweight, chunky, and aerates soil similarly to perlite.
Budget option: Buy a pre-made snake plant soil or cactus mix from any garden center. Prices are $5-10 per bag. This is the lazy person’s path to success; buy it and stop overthinking.
DIY mixing if you want to save money long-term: Mix standard potting soil with perlite or orchid bark at a 1:1 ratio. Don’t use pure cactus soil alone; while it drains fast, it can be too light and doesn’t retain enough moisture for consistent growth.
Why drainage matters so much: Water moves through fast-draining soil quickly. Roots dry out within a few days. Air fills the spaces where water was. Roots have the oxygen they need. No rot. This is the entire principle behind snake plant success.
Pot Selection Material, Size, and Drainage Holes
Drainage holes are non-negotiable. If you fall in love with a pot that doesn’t have drainage holes, buy a plastic nursery pot that fits inside it, double-potting. Never plant a snake plant in a pot without drainage. This is where negligence becomes negligence.
Material matters for water retention:
Terracotta: Breathable and porous. Water evaporates through the sides of the pot, so soil dries faster than in other materials. This is actually perfect for snake plants because it makes overwatering nearly impossible. Terracotta pots break if dropped, and they’re heavy. But for beginners, the fast drying is a safety net. I recommend terracotta for anyone new to snake plants.
Ceramic: Attractive and stable, but non-porous. Soil dries slower than in terracotta, faster than in plastic. Ceramic is fine if the pot has drainage holes; just be aware that soil will stay moist longer, so extend your watering intervals slightly.
Plastic: The most forgiving for beginners, counterintuitively. Plastic is heavier, harder to tip over, durable, and affordable. Soil dries slowest in plastic, which means you can water a bit more frequently without immediately triggering root rot. Plastic is lightweight and portable, perfect for renters. The only downside is that they’re less aesthetically pleasing to some people.
Pot size is where beginners go wrong:
Common mistake: upgrading to a much larger pot thinking the plant needs room to grow. This is false logic. Extra soil = extra moisture retained = higher overwatering risk.
Here’s the rule: Snake plants actually prefer slightly snug pots. The pot should be 2-4 inches larger in diameter than the root ball, not 6-8 inches larger.
Pot Size Comparison Table Placement
|
Plant Height |
Root Ball Diameter |
Pot Size |
Pot Type |
When to Upgrade |
|
4-6 small |
2-3 |
4-6 diameter |
Terracotta or ceramic |
When roots are visible circling soil 6-12 months |
|
12-18 medium |
4-5 |
6-8 diameter |
Terracotta preferred |
When roots are visible in drainage holes 2+ years |
|
24-36 tall |
6-8 |
8-10 diameter |
Terracotta or ceramic |
When growth stalls for a full year 3 years+ |
|
36+ large/statement |
10+ |
10-12+ diameter |
Heavy ceramic or terracotta |
Rarely; stable for 5+ years |
When and How to Repot
The repotting schedule:
- Every 2-3 years if the plant is actively growing
- When roots are circling the soil visible through drainage holes or when you unpot the plant
- When growth has stalled for a full year despite proper care
Signs of a root-bound plant:
- Roots visibly circling the bottom of the soil or coming out of drainage holes.
- Water runs straight through without being absorbed a sign the soil is packed with roots, not soil.
- The plant stops growing despite weeks of proper care and light.
Root-bound isn’t an immediate emergency. Plants can stay root-bound for months or years. It’s suboptimal, but not a crisis. Repot when you notice it, not urgently.
The repotting process has 7 steps:
- Choose a pot only 1-2 inches larger in diameter than the current pot. Not bigger; resist the temptation.
- Prepare fresh soil mix in a container or on a work surface. You’ll need enough to line the bottom of the new pot and fill the sides.
- Remove the plant from the old pot. Hold the base of the plant and gently wiggle it free. If it’s stuck, run a knife around the inside edge of the pot to loosen soil.
- Gently loosen the root ball. Use your fingers to break up the compacted roots. Don’t be aggressive; you’re just creating space for new roots to grow, not tearing roots apart. If roots are extremely densely packed, you can make vertical cuts down the outside of the root ball; yes, really, this encourages new growth.
- Inspect the roots: healthy roots are white or cream-colored and firm. Black or mushy roots are rotten; trim them if there aren’t many, or do a full rescue protocol if rot is extensive.
- Set up the new pot: add 1-2 inches of fresh soil to the bottom. Place the plant in the center so it sits at the same soil level as it did in the old pot. Planting too deep buries the rhizome, increasing the risk of rot; too shallow leaves roots exposed.
- Fill the sides with fresh soil; pat down gently so soil is snug but not compacted. Water lightly just enough to settle the soil, then wait 1 week before resuming normal watering. Fresh soil already has some moisture; the plant doesn’t need heavy watering right away.
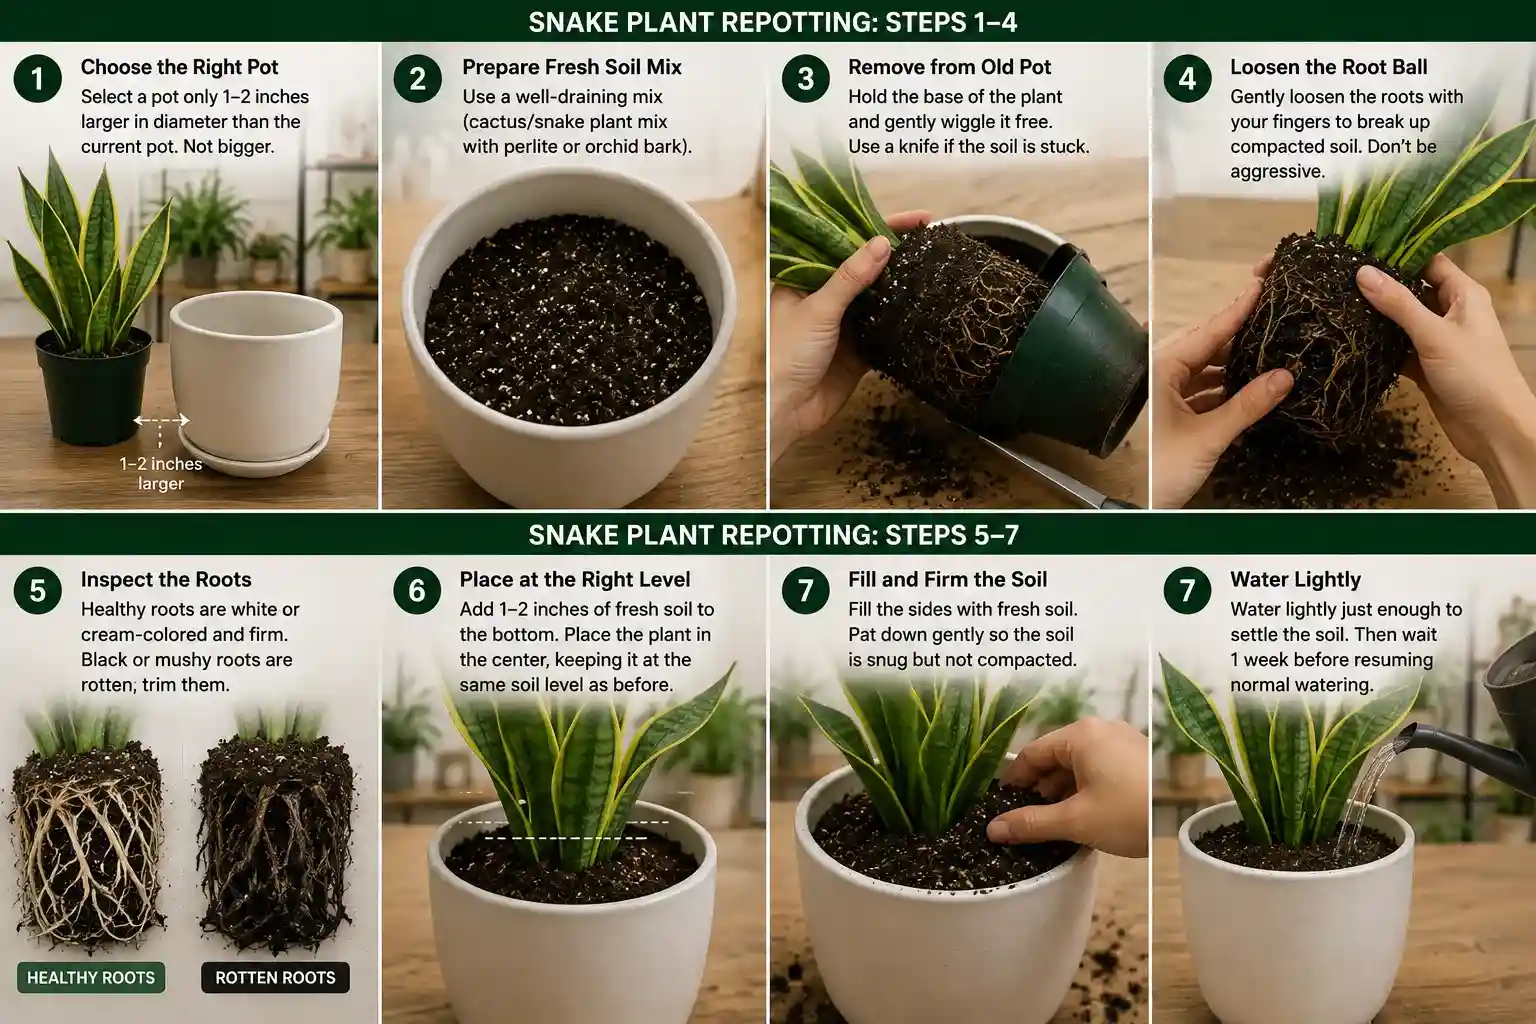
Critical detail: Plant at the same level. The soil line should align with the spot on the stems where it was in the old pot. Most beginners plant too deep, burying the rhizome and risking rot.
Don’t fertilize after repotting: Fresh potting soil contains nutrients. Fertilizing immediately adds excess nutrients and can burn roots. Wait 6 weeks before the next fertilizer application.
Repotting Mistakes and Why Root-Bound Isn’t Always an Emergency
Mistake #1: Upsizing too aggressively. Jumping from a 4-inch pot to an 8-inch pot is common among beginners. The reasoning is my plant needs room to grow. Wrong. The extra soil holds extra moisture. The plant sits in wet soil. Root rot follows. Go up one size, only 4 inches to 5 or 6 inches maximum.
Mistake #2: Repotting for the sake of it. If the plant is thriving and isn’t root-bound, don’t repot. Unnecessary repotting disturbs the root system and stresses the plant. Growth might temporarily slow. Only repot when you actually need to.
Mistake #3: Using standard potting soil in the new pot. You’ve just identified that overwatering is your plant’s killer, so you repot it… in soil that retains water? This resets the rot clock. Always use well-draining soil.
Mistake #4: Watering heavily right after repotting. Roots are already stressed from being moved. Waterlogged soil makes it worse. Water lightly just enough to settle the soil, then wait a full week before normal watering.
Mistake #5: Repotting when root-bound is advanced but the plant is healthy. Root-bound plants are actually stable and self-contained. If the plant is growing, looking healthy, and not struggling, root-bound is fine. Repot when growth stalls or roots are visibly coming out of drainage holes in a concerning way. Don’t repot just because a guide says to.
Feeding Your Snake Plant Does It Need Fertilizer, And When?
Snake plants don’t need frequent fertilizing. Feed once in spring and once in summer with diluted balanced fertilizer 10-10-10 or similar. In fall and winter, skip fertilizing entirely. Overfertilizing causes salt buildup and burned leaf tips.
Why Snake Plants Don’t Crave Fertilizer Unlike Other Houseplants
Here’s a fact that contradicts every commercial houseplant fertilizer ad you’ve ever seen: snake plants grow fine without any fertilizer, indefinitely.
This is because they evolved in poor, nutrient-deficient African soils. They’ve adapted to thrive with minimal nutrients. Their slow growth rate means they use nutrients slowly. If you fertilize them as heavily as you would a fast-growing tropical plant, you’ll overshoot their actual needs and cause damage.
Most houseplants need regular fertilizing because we’re growing them in containers with limited soil; the nutrients deplete quickly. Snake plants in containers can go 2-3 years without any fertilizer and still look healthy.
Nutrient overload is more dangerous for snake plants than nutrient deficiency. Excess fertilizer builds up in the soil as salt deposits. These salts burn the roots and appear on leaves as brown, crispy tips. Once salt burn happens, you have to flush the soil to recover.
The mentality shift: If a little fertilizer helps growth, a lot will speed it up. False. For succulents, more is the opposite of better.
Fertilizer Types and How to Choose
Liquid fertilizers are most popular: Dilute them in water, apply to the soil, rinse the pot. Easy to control dosage. Most common option. Brands don’t matter; any basic houseplant fertilizer works.
Slow-release fertilizer sticks or pellets: Inserted into soil, they release nutrients over months. Less control over dosage. Risk of salt accumulation over time. Not ideal for snake plants.
Organic fertilizers: worm castings, seaweed, fish emulsion: Gentler, slower results. These are fine but unnecessary. Standard liquid fertilizer works just as well.
Ideal NPK ratio for snake plants: Look for a balanced formula like 10-10-10 nitrogen-phosphorus-potassium in equal parts. This supports overall health. You don’t need specialty succulent or low-nitrogen formulas; a balanced formula works perfectly.
Application strength: Always dilute to half-strength or less. If the package says use 1 tablespoon per gallon, use ½ tablespoon. Less is safer than more with snake plants.
The Fertilizer Schedule Seasonal
|
Season |
Month |
Action |
Frequency |
Dosage |
Notes |
|
Spring |
March-May |
Fertilize |
1x only mid-spring |
Half-strength |
Growth begins; one light feeding is enough |
|
Summer |
June-August |
Fertilize |
1x only mid-summer |
Half-strength |
Peak growth; one second feeding during the season |
|
Fall |
September-November |
Stop |
None |
Growth slows; dormancy begins; no feeding needed |
|
|
Winter |
December-February |
Stop |
None |
Plant is fully dormant; fertilizing provides energy it isn’t using |
The reasoning: Spring and summer are growth seasons. Fertilizer supports this growth and replenishes nutrients the plant is using. Fall and winter, the plant slows or stops growing. Fertilizing a dormant plant is pointless; the plant isn’t using energy for growth, so it has no use for the nutrients. It just accumulates in the soil.
Two applications per year are literally all a snake plant needs.
Signs of Over- and Under-fertilizing
Overfertilizing salt buildup:
- White or brown crusty deposits on soil surface; salt crystallizing
- Leaf tips turn brown/crispy despite proper watering.
- Slower growth despite everything else being correct; salt restricts root function
- Plant looks stressed or weak.
Recovery: Flush the soil by watering thoroughly 2-3 times. Let water run through the pot completely each time, leaching out excess salt. After flushing, skip fertilizing for 6 months.
Under-fertilizing nutrient depletion:
- Extremely slow growth, stunted appearance
- Pale new leaves, though this is rare; low light causes this more often.
- This is uncommon. Most snake plants show signs of under-fertilizing only after 3+ years in the same soil without any fertilizer and with poor care otherwise.
In practice, under-fertilizing a snake plant is almost impossible if you repot every 2-3 years, fresh soil has nutrients, or fertilize even once yearly.