
ZZ Plant Propagation, Repotting, & Fertilizing Made Simple
Your ZZ plant is still alive. That’s already better than most people’s first attempt.
Now comes the part that trips up even experienced plant owners. They assume more fertilizer means faster growth. They repot into oversized pots because they’re “giving the roots more room.” They snip off a healthy stem and expect a brand-new plant by next weekend.
Unfortunately, that’s not how ZZ plants work.
What if I told you the healthiest ZZ plants are often the ones that get less fertilizer, fewer repottings, and a whole lot more patience? That the slow growth you’ve been worrying about is actually a sign the plant is doing exactly what nature designed it to do?
This is where you’ll learn how to help your ZZ plant grow without accidentally slowing it down. We’ll cover when to fertilize (and when not to), how to repot without causing root rot, what kind of soil actually works, and the easiest ways to propagate new plants from the one you already own.
By the end of this guide, you’ll know how to grow a healthier, fuller ZZ plant for years not by doing more, but by doing the right things at the right time.
Fertilizing: More Is Not Better
Fertilize ZZ plants every 4–6 weeks during active growth in spring/summer with a balanced, half-strength liquid fertilizer 10–10–10 or similar. Do not fertilize in fall or winter. ZZ plants thrive in low-nutrient conditions and don’t need heavy feeding. Over-fertilizing causes salt buildup and leaf burn.
Fertilizer Type & Schedule
Best choice: Balanced liquid fertilizer with an NPK ratio of 10–10–10 or close to it. Nitrogen (N) supports leaf growth, phosphorus (P) supports flowering and root development, and potassium (K) supports overall plant health.
Critical dosage: Dilute to HALF the recommended strength on the bottle. This is not a suggestion; this is the difference between a happy plant and a salt-damaged one. ZZ plants evolved in low-nutrient soils. They don’t expect the nutrient density of a fast-growing Monstera. Half-strength is perfect.
Frequency: Every 4–6 weeks from March–August only. Skip fall and winter completely.
Alternative: Slow-release granular fertilizer. One application in spring (April), one in early summer (June). It dissolves slowly throughout the season, eliminating the need for monthly applications.
Organic options: Worm castings mixed into potting soil at repotting time, or liquid seaweed fertilizer at half strength every 6 weeks. Both are gentler and slower-acting than synthetic fertilizers.
Signs of Over-Fertilizing
- White or tan crusty buildup on the soil surface = salt accumulation from excess fertilizer
- Brown or burnt leaf tips = same issue, nutrients concentrating to leaf edges
- Stunted new growth despite adequate light = nutrient burn blocking root function
- Fix: Flush the pot with distilled water once water pours through, diluting accumulated salts, then stop fertilizing for 2–3 months. Resume at half the previous frequency.
Growth Timeline: What To Expect Year By Year
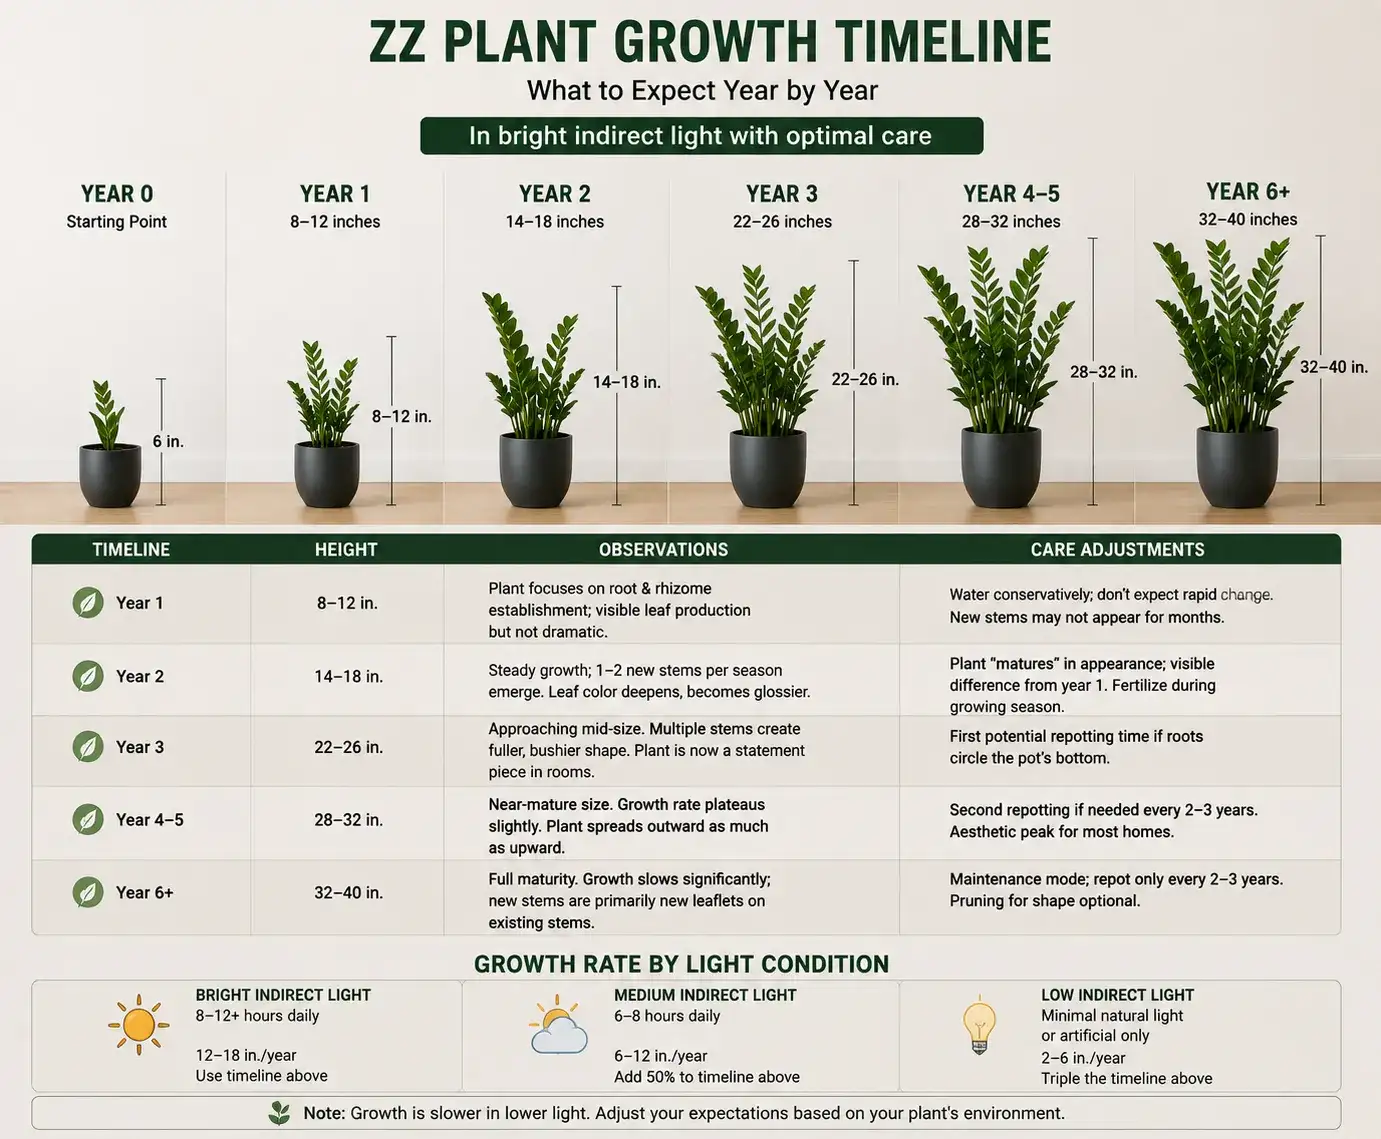
In bright indirect light with optimal care, a small 6-inch ZZ plant reaches 12 inches in year 1, 24 inches by year 3, and 30+ inches by year 5–6. In medium light, reduce these expectations by 30–50%. Growth is predictable and steady once established.
Year-by-Year Growth Expectations Starting from a 6-inch Plant
|
Timeline |
Height |
Observations |
Care Adjustments |
|
Year 1 |
8–12 in. |
Plant focuses on root & rhizome establishment; visible leaf production but not dramatic |
Water conservatively; don’t expect rapid change. New stems may not appear for months. |
|
Year 2 |
14–18 in. |
Steady growth; 1–2 new stems per season emerge. Leaf color deepens, becomes glossier. |
Plant “matures” in appearance; visible difference from year 1. Fertilize during growing season. |
|
Year 3 |
22–26 in. |
Approaching mid-size. Multiple stems create fuller, bushier shape. Plant is now a statement piece in rooms. |
First potential repotting time if roots circle the pot’s bottom. |
|
Year 4–5 |
28–32 in. |
Near-mature size. Growth rate plateaus slightly. Plant spreads outward as much as upward. |
Second repotting if needed every 2–3 years. Aesthetic peak for most homes. |
|
Year 6+ |
32–40 in. |
Full maturity. Growth slows significantly; new stems are primarily new leaflets on existing stems. |
Maintenance mode; repot only every 2–3 years. Pruning for shape optional. |
Growth Rate by Light Condition
- Bright indirect light 8–12+ hours daily: 12–18 in./year timeline above
- Medium indirect light 6–8 hours daily: 6–12 in./year; add 50% to timeline above; year 1 = 12–18 inches becomes 6–12
- Low indirect light, minimal natural light, or artificial only: 2–6 in./year; triple the timeline; year 1 = 6–12 inches becomes 2–4
Reading this table: If your plant is in medium light, year 3 isn’t “22–26 inches”; it’s roughly 12–18 inches. Year 5 might be 20–25 inches. This is why light placement matters so much.
Repotting & Propagation Timing: When & How
Repot every 2–3 years in spring, or when roots emerge from drainage holes. Use a pot only 1–2 inches larger than the current one; oversized pots trap moisture and cause root rot. Use a well-draining cactus soil mix; propagate in spring for best success rates.
When to Repot Signs It’s Time
- Roots circling the bottom of the pot or emerging from drainage holes.
- Plant becomes top-heavy and tips over easily.
- Watering runs straight through the pot without soaking in; soil is exhausted.
- Plant has been in the same pot for 2+ years.
- Best time to repot: Spring, March–May, when growth is active, and the plant recovers quickly
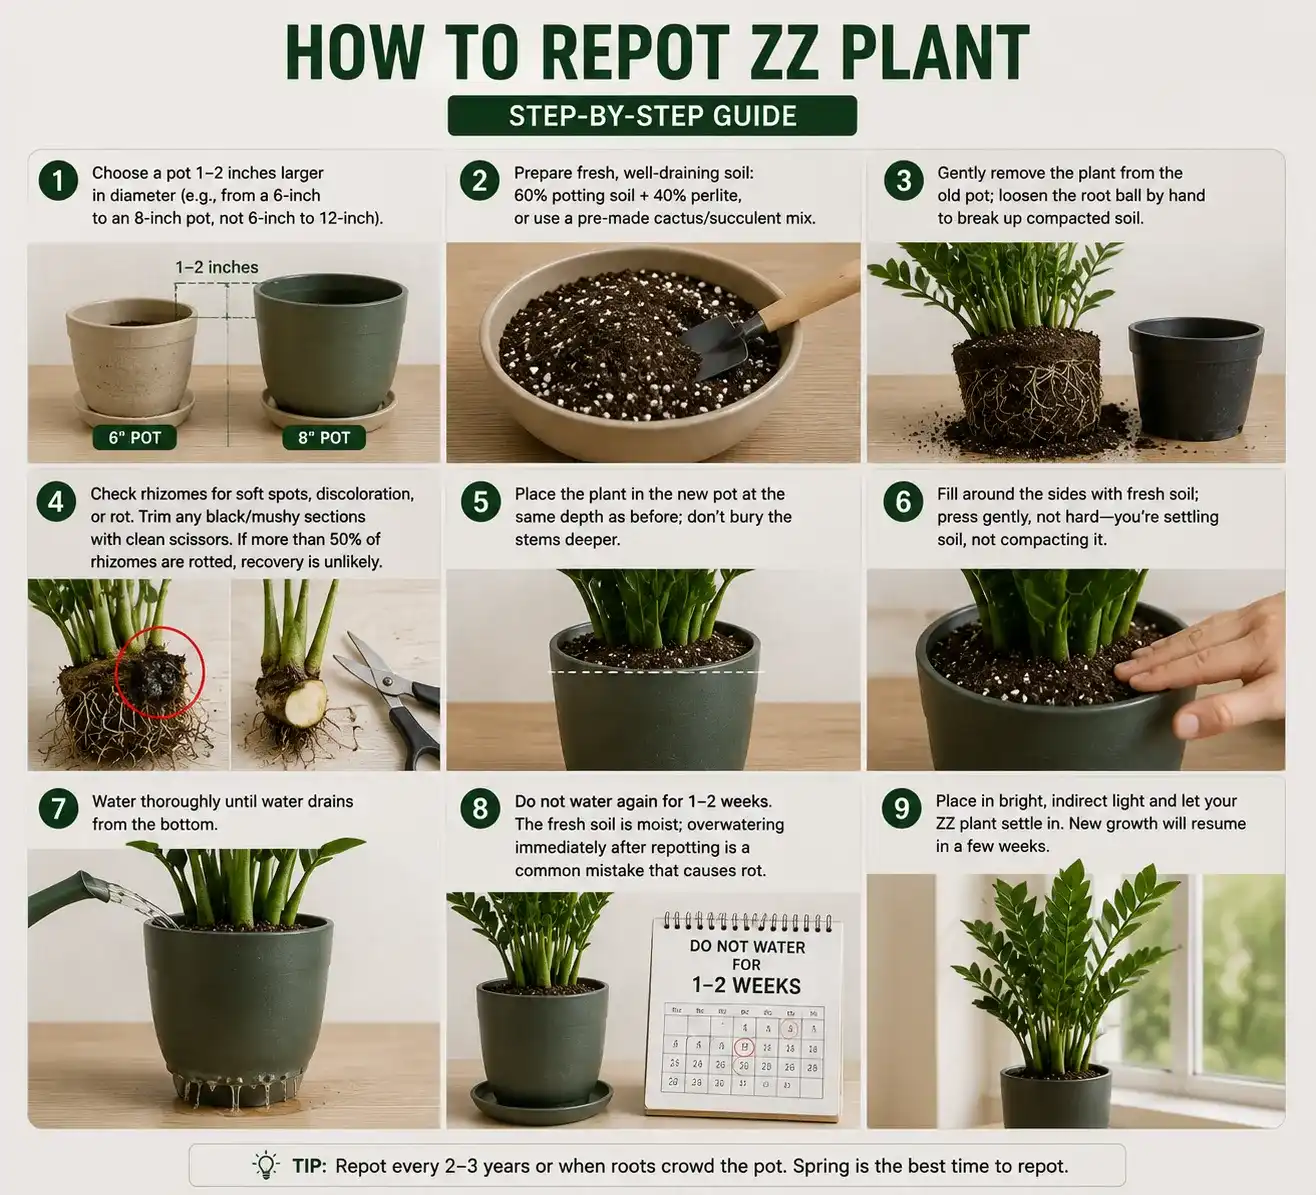
How to Repot Step-by-Step
- Choose a pot 1–2 inches larger in diameter (e.g., from a 6-inch to an 8-inch pot, not 6-inch to 12-inch).
- Prepare fresh, well-draining soil: 60% potting soil + 40% perlite, or use a pre-made cactus/succulent mix.
- Gently remove the plant from the old pot; loosen the root ball by hand to break up compacted soil.
- Check rhizomes for soft spots, discoloration, or rot. Trim any black/mushy sections with clean scissors. If more than 50% of rhizomes are rotted, recovery is unlikely.
- Place the plant in the new pot at the same depth as before; don’t bury the stems deeper.
- Fill around the sides with fresh soil; press gently, not hard you’re settling soil, not compacting it.
- Water thoroughly until water drains from the bottom.
- Do not water again for 1–2 weeks. The fresh soil is moist; overwatering immediately after repotting is a common mistake that causes rot.
When to Propagate Seasonal Timing
- Best time: Spring March–May when the plant has energy reserves for growth
- Acceptable: Early summer, June, if you’re patient
- Avoid: Fall/winter: low energy, longer rooting times, higher failure rates.
Spring-propagated cuttings root by mid-summer and establish by fall. Winter-propagated cuttings often rot before rooting because the plant isn’t investing energy in new root tissue.
ZZ Plant Propagation: Growing New Zz Plants And Clearing Up The Legality Myth
Propagate ZZ plants via stem cuttings; easiest: 4–8 weeks rooting, or leaf cuttings: slower: 8–12 weeks. Propagation is completely legal and encouraged in the USA, despite an internet myth. Cuttings require warm soil 70–75°F, bright indirect light, and patience; success rates are 50–70% with proper technique.
The Propagation Myth: Is It Legal to Grow ZZ Plant Cuttings?
The internet rumor: “It’s illegal to propagate ZZ plants commercially without a license.”
The truth: This rumor likely stems from a single Dutch patent 1989–2007 on a specific variegated cultivar called ZZ ‘Raven’ with near-black foliage. The patent expired in 2007. Another commercial cultivar, ‘Zenzi’ dwarf form, was also patented and expires or has expired around 2025–2026 depending on the jurisdiction.
Current status: It is 100% legal to propagate standard green ZZ plants and most variegated types in the USA, Canada, and the EU. Only commercial nursery propagation of certain patented cultivars required licensing, and even those patents are now expired or expiring. Home gardeners have always been exempt; only commercial growers needed licenses.
Why the myth persists: YouTube misinformation, Reddit posts from confused growers, and the general rule that some plants have patent restrictions, which is real, but ZZ’s restrictions were narrower than people think and time-limited.
Bottom line for readers: Propagate your ZZ plant freely. There is no legal barrier to growing cuttings at home. If you wanted to sell 1,000 ZZ ‘Raven’ plants commercially, licensing would have been required before 2007; no longer. For personal propagation, you’re completely clear.
Stem Cutting Propagation Fastest Method
This is the most reliable way to get new plants.
- Select a healthy stem with 2–3 leaflets attached. Choose green, firm stems; avoid any that look soft or discolored.
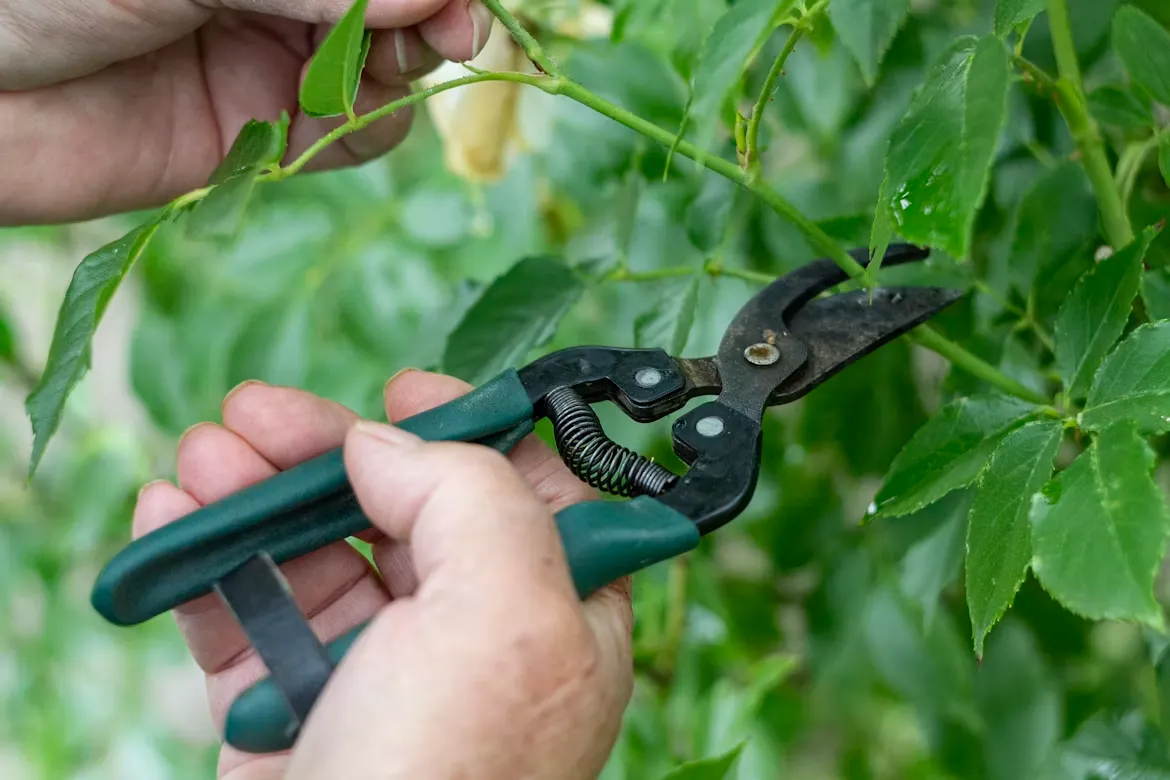
- Cut just below a node using clean scissors or pruners. A node is the slight ridge where a leaf emerged. Nodes contain dormant growth tissue and are where roots form.
- Remove lower leaflets, leaving 1–2 at the top. These lower leaflets would rot if buried in soil, and they don’t help rooting.
- Dip the cut end in rooting hormone; optional but increases success rate from 50% to 70%. Rooting hormone contains auxins that trigger root initiation.
- Plant in moist, well-draining soil: 50% perlite mixed with 50% potting soil creates the perfect rooting medium moisture-retentive but airy.
- Place in bright, indirect light and a warm location; 70–75°F is ideal. Warmth accelerates root initiation.
- Keep soil lightly moist, not wet. Mist every 3–4 days to maintain humidity around the cutting.
- Roots form in 4–8 weeks. Tiny white nubs appear at the base. New leaflets emerge weeks later at 8–12 weeks.
- Move to regular potting soil once established when you see visible new growth in the leaflets, not just roots. The plant is ready for the transition.
Success rate: 60–70% with warm soil and bright light.
Leaf Cutting Propagation More Plants, Slower
Want five new plants from one mother plant? Leaf cuttings are the method.
- Remove individual leaflets by gently twisting them away from the central stem and the midrib. Don’t pull hard; they’ll break. Gentle twisting comes off cleanly.
- Let them dry for 1–2 days on a paper towel. This reduces the risk of rot during the rooting phase.
- Plant in moist, well-draining medium, pressing each leaflet gently into the soil so it makes contact. Don’t bury it; press the base into the soil.
- Cover loosely with a humidity dome or plastic bag for the first 4–6 weeks. This maintains humidity without creating swamp conditions.
- Tiny rhizomes form at the base over 4–6 weeks. You’ll see a small white or pale nub forming where the leaflet connects to the soil. Beginners often mistake this for mold and discard it. It’s not. It’s a baby rhizome. Leave it alone.
- Patience: Leaflets take 8–12 weeks to root; move to regular soil only after small growth emerges from that rhizome nub.
- Success rate: 40–50% lower than stem cuttings, but each leaflet becomes a new plant, so you end up with more plants overall from fewer mother-plant resources.
Practitioner knowledge technical detail: Leaf cuttings often produce a visible tiny rhizome “nugget” at the base weeks before any roots or shoots appear. Beginners mistake this nugget for failed tissue and discard it. The nugget is exactly the sign the cutting is working; leave it undisturbed for another 4–6 weeks, and you’ll see shoots emerge from it.
Common Propagation Mistakes
Overwatering cuttings before rooting
- Problem: Cuttings rot before rooting develops
- Fix: Mist, don’t saturate. Soil should be moist, not waterlogged.
Cold soil below 65°F
- Problem: Rooting dramatically slows or stops; cold temps halt hormone activity
- Fix: Bottom heating mat $15–$30 keeps soil at 70–75°F and accelerates rooting by 50%
Insufficient light
- Problem: Cuttings weaken instead of energy going to roots
- Fix: Bright indirect light for 10–12 hours daily.
Transplanting too early
- Problem: Roots and rhizome are fragile; moving before they’re established kills most cuttings
- Fix: Only move to regular soil after visible new growth emerges, not just when roots appear
See our complete guide to houseplant propagation methods for detailed steps on other plant types.